System Design For Beginners: Everything You Need in One Article

There is no pre-requisite to read this blog. Everything is written for complete beginners.
This is a detailed blog that covers all the topics you need to master to solve any system design problem in interviews. You will not need to study any more theory except this blog. Directly start attempting interview problems after reading this blog.
For system design, in most places, you will only see theoretical stuff, but in this blog, I have tried to show the practical implementation of a lot of things so you will not just be preparing for interviews but also know how these things are being used in the real world.
Content of this blog
- Why study System Design?
- What is a Server?
- Latency and Throughput
- Scaling and its types
- – Vertical Scaling
- – Horizontal Scaling
- Auto Scaling
- Back-of-the-envelope Estimation
- CAP Theorem
- Scaling of Database
- – Indexing
- – Partitioning
- – Master Slave Architecture
- – Multi-master Setup
- – Database Sharding
- – Disadvantage of sharding
- SQL vs NoSQL Databases and when to use which Database
- – SQL Database
- – NoSQL Database
- – Scaling in NoSQL vs SQL
- – When to use which database?
- Microservices
- – What is Monolith and Microservice?
- – Why do we break our app into microservices?
- – When to use Microservice?
- – How do clients request in a microservice architecture?
- Load Balancer Deep Dive
- – Why do we need the Load Balancer?
- – Load Balancer Algorithms
- Caching
- – Caching Introduction
- – Benefits of Caching
- – Types of Caches
- – Redis Deep Dive
- Blob Storage
- – What is a Blob, and why do we need Blob Storage?
- – AWS S3
- Content Delivery Network (CDN)
- – CDN Introduction
- – How does CDN work?
- – Key Concepts in CDNs
- Message Broker
- – Asynchronous Programming
- – Why did we put a message broker in between?
- – Message Queue
- – Message Stream
- – When do we use Message Broker
- Apache Kafka Deep Dive
- – When to use Kafka
- – Kafka Internals
- Realtime Pubsub
- Event-Driven Architecture
- – Introduction to EDA
- – Why use EDA?
- – Simple Event Notification
- – Event-Carried State Transfer
- Distributed Systems
- Auto-Recoverable System using Leader Election
- Big Data Tools
- Consistency Deep Dive
- – Strong Consistency
- – When to choose strong consistency
- – Eventual Consistency
- – When to choose eventual consistency
- – Ways to achieve strong consistency
- – Ways to achieve eventual consistency
- Consistent Hashing
- Data Redundancy and Data Recovery
- – Why do we make databases redundant?
- – Different ways of doing data backup
- – Continuous Redundancy
- Proxy
- – What is Proxy?
- – Forward Proxy
- – Reverse Proxy
- – Building our own Reverse Proxy
- How to solve any System Design Problem?
Why study System Design?
You may have built some personal projects in college where you have a backend in NodeJS (or any other framework) and a Database.
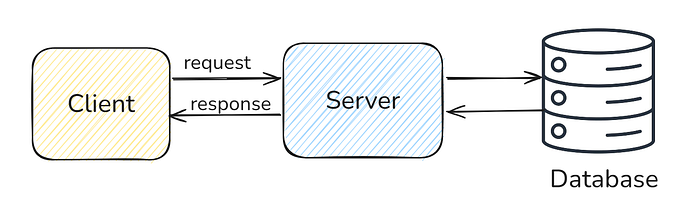
User (or client) requests to your application. Then you may be doing some calculations in the backend server and performing CRUD operations in the database to return a response. This is good for prototype and personal projects, but in the real world, when we have actual users (in millions or billions), this simple architecture may not work. We need to think about scaling, fault tolerance, security, monitoring and all sorts of things to make our system reliable and work efficiently in all cases. For this we study different concepts in system design.
Note: Whenever I make the box for a client, then this client can be anything. It can be a ReactJS application, Android application, IOS application or anything that a normal person is using on his/her device (laptop, phone etc).
What is a Server?
Many of you might already know what a server is, but this blog is for beginners, so I am explaining it.
A server is nothing but a physical machine (such as a laptop) where your application code is running. When you build a ReactJS or NodeJS application then, your application runs on http://localhost:8080 . Localhost is the domain name which resolves to the IP Address 127.0.0.1 . This IP address is the IP address of the local laptop.
For external websites, you type https://abc.com. When you hit this in your browser, the following things happen:
abc.comgoes to the DNS (Domain Name Service) resolver to find the IP address of the server which corresponds to this domain. Every server has an IP address. Its a physical address which is unique for each device.- Your browser got the IP address of the server. With the help of an IP Address, your browser requests the server.
- Now, the server got the request. In a server, there are multiple applications running. (Like on your laptop, there are multiple applications running at the same time, such as Google Chrome, Netflix, etc). The server finds the correct application with the help of Port. Then it returns the response.
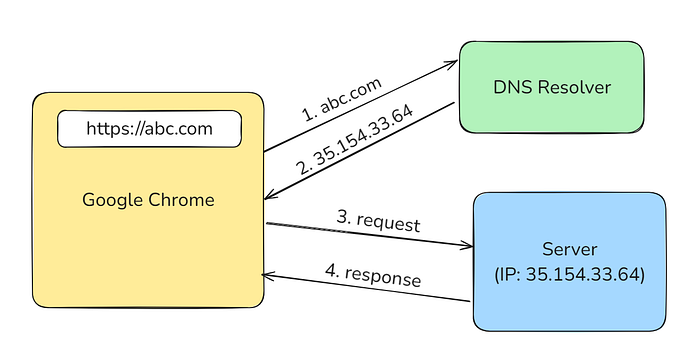
Requesting https://abc.com is the same as requesting 35.154.33.64:443. Here, 443 is the port (default port of https).
Remembering IP Addresses is tough, so people generally buy domain names for it and point their domain name to their server’s IP address.
How to deploy an application?
Your application runs on Port 8080. Now, you want to expose it to the internet so that other people can visit your website. For this, you need to buy a public IP Address and attach this public IP address to your laptop so that people can hit https://<your_laptop_ip_address>:8080 to visit your site.
Doing all this and managing the server on your own is a pain, so people generally rent servers from Cloud Providers such as AWS, Azure, GCP, etc. They will give you a virtual machine where you can run your application, and that machine also has a public IP address attached to it, so you can visit it from anywhere. In AWS, this virtual machine is called EC2 Instance. And putting your application code into the virtual machine of a cloud provider from your local laptop is called deployment.
Exercise for you: If you want to see this in action, how to deploy a simple application in AWS, then read this blog.
Latency and Throughput
These are two words that you often hear.
Latency
Latency is the time taken for a single request to travel from the client to the server and back (or a single unit of work to complete). It is usually measured in milliseconds (ms).
Loading a webpage: If it takes 200ms for the server to send the page data back to the browser, the latency is 200ms.
In simple terms, if a website loads faster, then it takes less time, so it has low latency. If it loads slower, then it takes more time, so it has high latency.
Round Trip Time (RTT): The total time it takes for a request to go to the server and for the response to come back. Sometimes, you can also hear RTT as a replacement word for latency.
Throughput
Throughput is the number of requests or units of work the system can handle per second. It is typically measured in requests per second (RPS) or transactions per second (TPS).
Every server has a limit, which means it can handle X number of requests per section. Giving further load can choke it, or it may go down.
- High Throughput: The system can process many requests at the same time.
- Low Throughput: The system struggles to process many requests concurrently.
In the ideal case, we want to make a system whose throughput is high, and latency is low.
Example:
Latency: The time it takes for a car to travel from one point to another (e.g., 10 minutes).
Throughput: The number of cars that can travel on a highway in one hour (e.g., 1,000 cars).
In short,
- Latency measures the time to process a single request.
- Throughput measures how many requests can be handled concurrently.
Scaling and its types
You often see that whenever someone launches their website on the internet and suddenly traffic increases, their website crashes. To prevent this, we need to scale our system.
Scaling means we need to increase the specs of our machine (like increasing RAM, CPU, storage etc) or add more machines to handle the load.
You can relate it with the example of a mobile phone, when you buy a cheap mobile with less RAM and storage then your mobile hangs by using heavy games or a lot of applications simultaneously. The same happens with the EC2 instance, when a lot of traffic comes at the same time then it also starts choking, that time we need to scale our system.
Types of Scaling
It is of 2 types:
- Vertical Scaling
- Horizontal Scaling
Vertical Scaling (Scale Up/Down)
If we increase the specs (RAM, Storage, CPU) of the same machine to handle more load, then it is called vertical scaling.
This type of scaling is mostly used in SQL databases and also in stateful applications because it is difficult to maintain consistency of states in a horizontal scaling setup.
Horizontal Scaling (Scale Out/In)
Vertical scaling is not possible beyond a point. We can’t infinitely increase the specs of the machine. We will hit a bottleneck, and beyond that, we can’t increase the specs.
The solution to this is to add more machines and distribute the incoming load. It is called horizontal scaling.
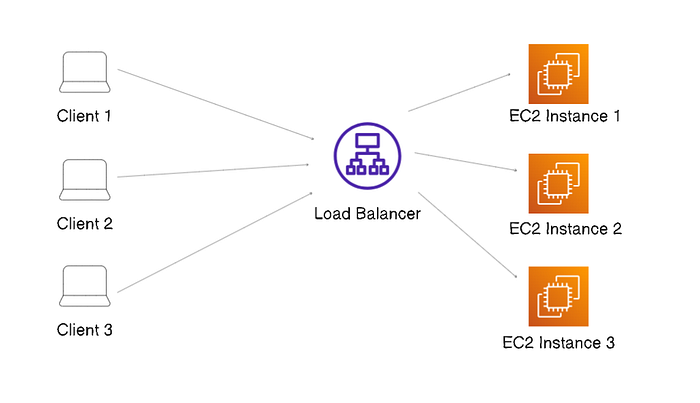
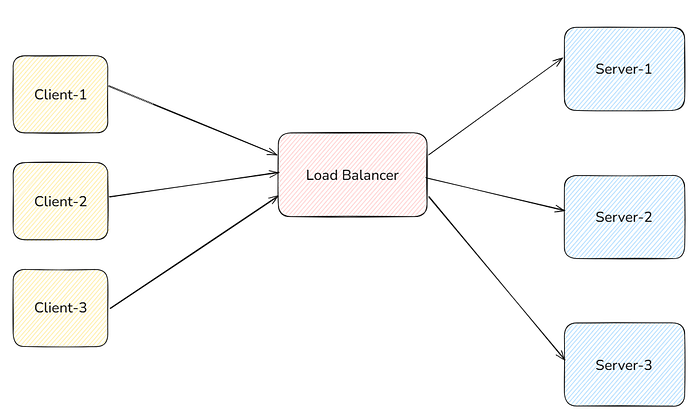
Ex: We have 8 clients and 2 machines and distribute our load. We want to distribute the load equally so the first 4 clients can hit one machine-1 and the next 4 clients can hit machine-2. Clients are not smart; we can’t give them 2 different IP addresses and let them decide what machine to hit because they don’t know about our system. For this, we put a load balancer in between. All the clients hit the load balancer, and this load balancer is responsible for routing the traffic to the least busy server.
In this setup, Clients don’t make requests directly to the server. Instead, they send requests to the load balancer. The load balancer takes the incoming traffic and transfers it to the least busy machine.
Most of the time, in the real world, we use horizontal scaling.
Below is the picture where you can see that 3 clients are making requests, and the load balancer distributes the load in 3 EC2 instances equally.
Exercise for you: If you want to see this in action, how to do horizontal scaling and set up a load balancer using AWS, then read this blog.
Auto Scaling
Suppose you started a business and made it online. You rented an EC2 server to deploy your application. If a lot of users come to your website at the same time, then your website may crash because the EC2 server has limitations (CPU, RAM, etc) on serving a certain number of users concurrently at one time. At this time, you will do horizontal scaling and increase the number of EC2 instances and attach a load balancer.
Suppose one EC2 machine can serve 1000 users without choking. If the number of users on our website is not constant. Some days, we have 10,000 users on our website, which can be served by 10 instances. Some days, we have 100,000 users then we need 100 EC2 instances. One solution might be to keep running the maximum number (100) of EC2 instances all the time. In this way, we can serve all users at all times without any problem. But during low-traffic periods, we are wasting our money in extra instances. We only need 10 instances, but we are running 100 instances all the time and paying for it.
The best solution for this is to run only the required number of instances every time. And add some sort of mechanism that if CPU usage of an EC2 instance goes up to a certain threshold (say 90%) then launch another instance and distribute the traffic without us manually doing this. This changing number of servers dynamically based on the traffic is called Auto Scaling.
Note: These numbers are all hypothetical to make you understand the topic. If you want to find the actual threshold, then you can do Load Testing on your instance.
Exercise for you: If you want to see this in action, how to configure Auto Scaling using AWS, then read this blog.
Back-of-the-envelope Estimation
You can see that above, in the horizontal scaling, we saw that we need more servers to handle the load. In back-of-the-envelope estimation, we estimate the number of servers, storage, etc., needed.
In System Design Interviews, it is good to spend 5 minutes (but not more than that) on this.
We do approximation here to make our calculation easy.
Below is a handy table. Must remember.
|Power of 2| Approximate value| Power of 10 | Full name   |  Short name |
|----------|------------------|-------------|-------------|-------------|
|  10      |  1 Thousand      |   3         |  1 Kilobyte |   1 KB      |
|  20      |  1 Million       |   6         |  1 Megabyte |   1 MB      |
|  30      |  1 Billion       |   9         |  1 Gigabyte |   1 GB      |
|  40      |  1 Trillion      |   12        |  1 Terabyte |   1 TB      |
|  50      |  1 Quadrillion   |   15        |  1 Petabyte |   1 PB      |
There can be many things that you can calculate here, but I prefer doing calculations of only below things:
- Load Estimation
- Storage Estimation
- Resource Estimation
Let’s take an example of Twitter and do this calculation.
Load Estimation
Here, ask for DAU (Daily Active Users). Then, calculate the number of reads and the number of writes.
Suppose Twitter has 100 million daily active users, and one user posts 10 tweets per day.
Number of Tweets in one day
- 100 million * 10 tweets = 1 billion tweets per day
This means the number of writes = 1 billion tweets per day.
Suppose 1 user reads 1000 tweets per day.
Number of reads in one day
- 100 million * 1000 tweets = 100 billions reads per day
Storage Estimation
Tweets are of two types:
Normal tweet and tweet with a photo. Suppose only 10% of the tweets contain photos.
Let one tweet comprise 200 characters. One character is of 2 bytes and one photo is of 2 MB
Size of one tweet without photo = 200 character * 2 byte = 400 bytes ~ 500 bytes
Total no. of tweets in one day = 1 billion (as calculated above)
Total no. of tweets with photo = 10% of 1 billion = 100 million
Total Storage required for each day:
=> (Size of one tweet) * (Total no. of tweets) + (Size of photo) * (total tweets with photo)
=> (500 bytes * 1 billion) + (2MB * 100 million)
Take approx to make calculation easy:
=> (1000 bytes * 1 billion) + (2MB * 500 million)
=> 1 TB + 1 PB
Which is approx = 1 PB (ignore 1TB as it is very small to 1PB, so adding it won’t matter)
Each Day we require 1 PB of storage.
Resource Estimation
Here, calculate the total number of CPUs and servers required.
Assuming we get 10 thousand requests per second and each request takes 10 ms for the CPU to process.
Total CPU time to process:
(10,000 rqst Per sec) * (10ms) = 100,000 ms Per second CPU requires.
Assuming each core of the CPU can handle 1000 ms of processing per second, the total no. of cores required:
=> 100,000 / 1000 = 100 cores.
Let one server have 4 cores of CPU.
So, the total no. of servers required = 100/4 = 25 servers.
So, we will keep 25 servers with a load balancer in front of them to handle our requests.
CAP Theorem
This theorem states a very important tradeoff while designing any system.
CAP theorem consists of 3 words:
- C: Consistency
- A: Availability
- P: Partition Tolerance
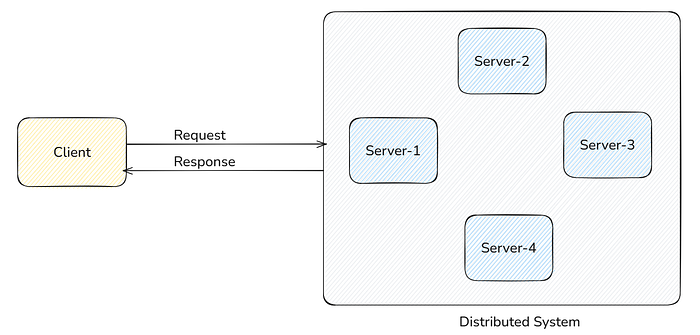
Everything we will discuss in the CAP theorem is in terms of distributed systems.
Distributed System means data is stored in multiple servers instead of one, as we saw in horizontal scaling.
Why do we make the system distributed?
- With multiple servers, we can spread the workload & handle more requests simultaneously, improving overall performance.
- Keep Databases in different locations and serve data from the nearest location to the user. It reduces the time of access & retrieval.
One individual server that is part of the overall distributed system is called Node.
In this system, we replicate the same data across different servers to get the above benefits.
You can see this in the picture below. The same data is stored in multiple database servers (nodes) kept in different locations in India.
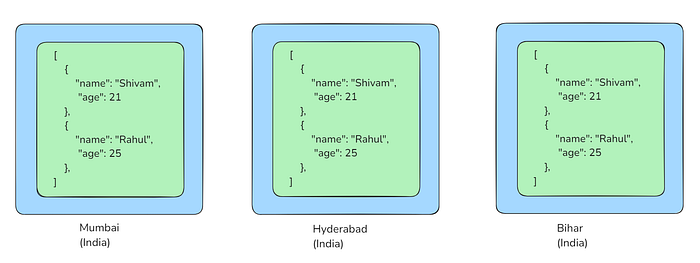
If data is added in one of the nodes then it gets replicated into all the other nodes automatically. How this replication happens, we will talk about it later in this blog.
Let's discuss all 3 words of CAP:
- Consistency: Every read request returns the same result irrespective of whichever node we are reading from. This means all the nodes have the same data at the same time. In the above picture, you can see that our database cluster is consistent because every node has the same data.
- Availability: The system is available and always able to respond to requests, even if some nodes fail. This means even if some node failures occur, the system should continue serving requests with other healthy nodes.
- Partition Tolerance: The system continues to operate even if there is a communication breakdown or network partition between different nodes.
Availability is continued serving when node failure happens.
Partition Tolerance is continued serving when “network failures” happen.
Example: Let there be 3 nodes A, B, C.
- Consistency: A, B and C all have the same data. If there is an update in node B, then data replication happens, and B will propagate that update to A and C.
- Availability: Let node B experience a hardware failure and go offline. Nodes A and C are still operational. Despite the failure of node B, the system as a whole remains available because nodes A and C can still respond to client requests.
- Partition Tolerance: Network partition happens that separates B from A and C. Node B can still function and serve requests, but it can’t communicate with A and C.
What is the CAP Theorem
CAP theorem states that in a distributed system, you can only guarantee two out of these three properties simultaneously. It’s impossible to achieve all three.
- CA — Possible
- AP — Possible
- CP — Possible
- CAP — Impossible
It is quite logical if you think of it.
In a distributed system, network partition is bound to happen, so the system should be Partition tolerant. This means for a distributed system, “P” will always be there. We will make a tradeoff between CP and AP.
Why can we only achieve CP or AP and not CAP?
- Again, take the same example of nodes A, B, and C.
- Suppose a network partition happens, and B loses its communication with A and C.
- Then B will not be able to propagate its changes to A and C.
- If we prioritise availability, then we will continue to serve requests. B is not able to propagate its changes with A & C. So, users who are served from B might get different results from the ones who are served from A & C. Therefore, we achieved availability by sacrificing consistency.
- If we prioritise consistency, then we will not take requests until the network partition of B is resolved because we don’t want the write operation of B to not reach nodes A and C. We want the same data in A, B, and C. Therefore, we achieved consistency by sacrificing availability.
Why not choose CA?
- CA means network partition is not happening, you can achieve both consistency and availability because communication is not a problem.
- In a practical scenario, network partition is bound to happen in a distributed system. So, we choose between CP or AP.
What to choose, CP or AP?
- For secure apps like banking, payments, stocks, etc, go with consistency. You can’t afford to show inconsistent data.
- For social media etc, go with availability. If likeCount on a post is inconsistent for different users, we are fine.
Scaling of Database
You normally have one database server; your application server queries from this DB and gets the result.
When you reach a certain scale, this database server starts giving slow responses or may go down because of its limitations. In that situation, how to scale the database, which we will be going to study in this section.
We will be scaling our database step by step, which means if we have only 10k users, then scaling it to support 10 million is a waste. It’s over-engineering. We will only scale up to that limit which is sufficient for our business.
Suppose you have a database server, and inside that, there is a user table.

There are a lot of read requests fired from the application server to get the user with a specific ID. To make the read request faster, do the following thing:
Indexing
Before indexing, the database checks each row in the table to find your data. This is called a full table scan, and it can be slow for large tables. It takes O(N) time to check each id.
With indexing, the database uses the index to directly jump to the rows you need, making it much faster.
You make the “id” column indexed, then the database will make a copy of that id column in a data structure (called B-trees). It uses the B-trees to search the specific id. Searching is faster here because IDs are stored in a sorted way such that you can apply a binary search kind of thing to search in O(logN).
If you want to enable indexing in any column, then you just need to add one line of syntax, and all the overhead of creating b-trees, etc, is handled by DB. You don’t need to worry about anything.
This was a very short and simple explanation about indexing.
Partitioning
Partitioning means breaking the big table into multiple small tables.
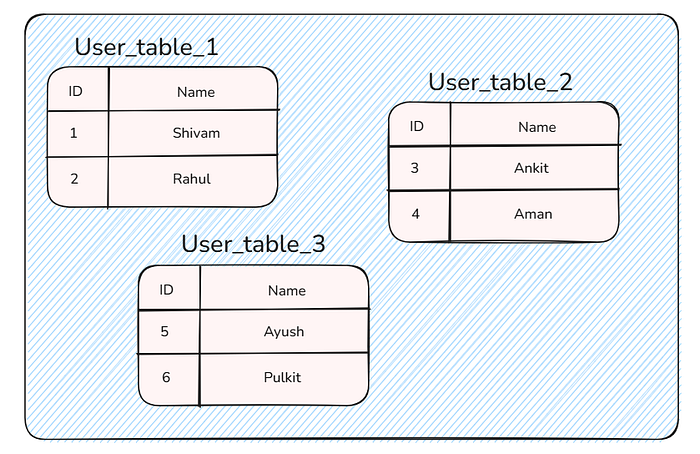
You can see that we have broken the users table into 3 tables:
- user_table_1
- user_table_2
- user_table_3
These tables are kept in the same database server.
What is the benefit of this partitioning?
When your index file becomes very big, then it also starts showing some performance issues when searching on that large index file. Now, after partitioning, each table has its own index, so searching on smaller tables is faster.
You may be wondering how we know which table to query from. Since before that, we can hit SELECT * FROM users where ID=4 . Don’t worry, you can again hit the same query. Behind the scenes, PostgreSQL is smart. It will find the appropriate table and give you the result. But you can also write this configuration on the application level as well if you want.
Master Slave Architecture
Use this method when you hit the bottleneck, like even after doing indexing, partitioning and vertical scaling, your queries are slow, or your database can’t handle further requests on the single server.
In this setup, you replicate the data into multiple servers instead of one.
When you do any read request, your read request (SELECT queries) will be redirected to the least busy server. In this way, you distribute your load.
But all the Write requests (INSERT, UPDATE, DELETE) will only be processed by one server.
The node (server) which processes the write request is called the Master Node.
Nodes (servers) that take the read requests are called Slave Nodes.
When you make a Write Request, it is processed and written in the master node, and then it asynchronously (or synchronously depending upon configuration) gets replicated to all the slave nodes.

Multi-master Setup
When write queries become slow or one master node cannot handle all the write requests, then you do this.
In this, instead of a single master, use multiple master databases to handle writes.
Ex: A very common thing is to put two master nodes, one for North India and another for South India. All the write requests coming from North India are processed by North-India-DB, and all the write requests coming from South India are processed by South-India-DB, and periodically, they sync (or replicate) their data.
In a multi-master setup, the most challenging part is how you would handle conflicts. If for the same ID, there are two different data present in both masters, then you have to write the logic in code like do you want to accept both, override the previous with the latest one, concatenate it, etc. There is no rule here. It totally depends upon the business use case.
Database Sharding
Sharding is a very complex thing. Try to avoid this in practical life and only do this when all the above things are not sufficient and you require further scaling.
Sharding is similar to partitioning, as we saw above, but instead of putting the different tables in the same server, we put it into a different server.
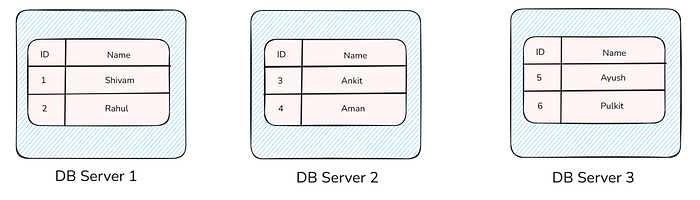
You can see in the above picture we cut the table into 3 parts and put it into 3 different servers. These servers are usually called shards.
Here, we did sharding based on IDs, so this ID column is called a sharding key.
Note: The sharding key should distribute data evenly across shards to avoid overloading a single shard.
Each partition is kept in an independent database server (called a shard). So, now you can scale this server further individually according to your need, like doing master-slave architecture to one of the shards, which takes a lot of requests.
Why sharding is difficult?
In partitioning (keeping chunks of the table in the same DB server), you don’t have to worry about which table to query from. PostgreSQL handles that for you. But in sharding (keeping chunks of the table in different DB servers), you have to handle this at the application level. You need to write a code such that when querying from id 1 to 2, it goes to DB-1; when querying id 5–6, it goes to DB-3. Also, when adding a new record, you manually need to handle the logic in the application code that in which shard you are going to add this new record.
Sharding Strategies
- Range-Based Sharding:
- Data is divided into shards based on ranges of values in the sharding key.
- Example:
- Shard 1: Users with
user_id 1–1000. - Shard 2: Users with
user_id 1001–2000 - Shard 3: Users with
user_id 2001–3000 - Pros: Simple to implement.
- Cons: Uneven distribution if data is skewed (e.g., some ranges have more users).
- Hash-Based Sharding:
- A hash function is applied to the sharding key, and the result determines the shard.
- Example:
HASH(user_id) % number_of_shardsdetermines the shard.- Pros: Ensures even distribution of data.
- Cons: Rebalancing is difficult when adding new shards, as hash results change.
- Geographic/Entity-Based Sharding:
- Data is divided based on a logical grouping, like region or department.
- Example:
- Shard 1: Users from America.
- Shard 2: Users from Europe.
- Pros: Useful for geographically distributed systems.
- Cons: Some shards may become “hotspots” with uneven traffic.
- Directory-Based Sharding:
- A mapping directory keeps track of which shard contains specific data.
- Example: A lookup table maps
user_idranges to shard IDs. - Pros: Flexibility to reassign shards without changing application logic.
- Cons: The directory can become a bottleneck.
Disadvantage of sharding
- Difficult to implement because you have to write the logic yourself to know which shard to query from and in which shard to write the data.
- Partitions are kept in different servers (called shards). So, when you perform joins, then you have to pull out data from different shards to do the join with different tables. It is an expensive operation.
- You lose consistency. Since different parts of data are present in different servers. So, keeping it consistent is difficult.
Sum up of Database Scaling
After you read the DB Scaling section, let us remember these rules:
- First, always and always prefer vertical scaling. It's easy. You just need to increase the specs of a single device. If you hit the bottleneck here then only do the below things.
- When you have read heavy traffic, do master-slave architecture.
- When you have write-heavy traffic, do sharding because the entire data can’t fit in one machine. Just try to avoid cross-shard queries here.
- If you have read heavy traffic but master-slave architecture becomes slow or not able to handle the load, then you can also do sharding and distribute the load. But it generally happens on a very large scale.
SQL vs NoSQL Databases and when to use which Database
Deciding the correct database is the most essential part of system design, so read this section carefully.
SQL Database
- Data is stored in the form of tables.
- It has a predefined schema, which means the structure of the data (the tables, columns, and their data types) must be defined before inserting data.
- It follows ACID properties, ensuring data integrity and reliability.
- Ex: MySQL, PostgreSQL, Oracle, SQL Server, SQLite.
NoSQL Database
- It is categorized into 4 types:
- – Document-based: Stores data in documents, like JSON or BSON. Ex: MongoDB.
- – Key-value stores: Stores data in key-value pairs. Ex: Redis, AWS DynamoDB
- – Column-family stores: Stores data in columns rather than rows. Ex: Apache Cassandra
- – Graph databases: Focuses on relationships between data as it is stored like a graph. Useful in social media applications like creating mutual friends, friends of friends, etc. Ex: Neo4j.
- It has a flexible schema, which means we can insert new data types or fields which may not be defined in the initial schema.
- It doesn’t strictly follow ACID. It prioritizes other factors, such as scalability and performance.
Scaling in SQL vs NoSQL
- SQL is designed primarily to scale vertically, which means increasing the hardware (CPU, RAM, storage) of a single server to handle larger data volumes.
- NoSQL databases are designed primarily to scale horizontally, which means adding more servers (nodes) to a cluster to handle increasing data volumes.
- Generally, sharding is done in NoSQL DBs to accommodate large amounts of data.
- Sharding can also be done in SQL DB, but generally, we avoid it because we use SQL DB for ACID, but ensuring data consistency becomes very difficult when data is distributed across multiple servers and querying data by JOINS across shards is also complex and expensive.
When to use which database?
- When data is unstructured and want to use flexible schema, go with NoSQL.
- Ex: reviews, recommendation of e-commerce app
- When data is structured and has a fixed schema, go with SQL.
- Ex: customer accounts table of e-commerce app
- If you want data integrity and consistency, go with SQL DB because it maintains the ACID property.
- Ex: Financial transactions, account balances of banking app
- Orders, payments of e-commerce app.
- Stock trading platforms.
- If you want high availability, scalability (means storing large amounts of data which doesn’t fit in one server), and low latency, go with NoSQL because of horizontal scalability & sharding.
- Ex: Posts, likes, comments, messages of social media app.
- Store large amounts of real-time data, such as the driver location of a delivery app.
- When you want to perform complex queries, joins, and aggregations, go with SQL. Generally, we have to do complex queries, joins, etc, when performing data analytics. Store required data for those in SQL.
Microservices
What is Monolith and Microservice?
Monolith: The entire application is built as a single unit in a monolithic architecture. Suppose you are building an e-commerce app. In a monolith, you only make one backend and entire functionality (like user management, product listing, order, payment, etc) in one app.
Microservice: Break down large applications into smaller, manageable, and independently deployable services.
Ex: For an e-commerce app, suppose you break it into the following services:
— User Service
— Product Service
— Order Service
— Payment Service
Make separate backend apps for each service.
Why do we break our app into microservices?
- Suppose one component has a lot of traffic and requires more resources; then, you can scale only that service independently.
- Flexibility to choose tech stack. In a monolith, the whole backend is written in one single language/tech. But in microservice, you can write different services into different tech stacks. Ex: You can build User Service in NodeJS and Order Service in Golang.
- Failure of one service doesn’t necessarily impact others. In a monolith, suppose one part of the backend crashes, then the whole app crashes. But in microservices, if the the Order service crashes still, other parts, such as the User and Product Service, are unaffected.
When to use Microservice?
- “Microservices of any startup defines its internal team structure”. Suppose a startup has 3 teams working in 3 different business functionalities. Then, it will have 3 microservices, and as no. of team grows, microservices will also split.
- Most startups start with a monolith because, at the starting point, only 2–3 people work on the tech side, but it eventually moves to microservice when no. of teams increases.
- When we want to avoid single-point failure, then also we choose microservice.
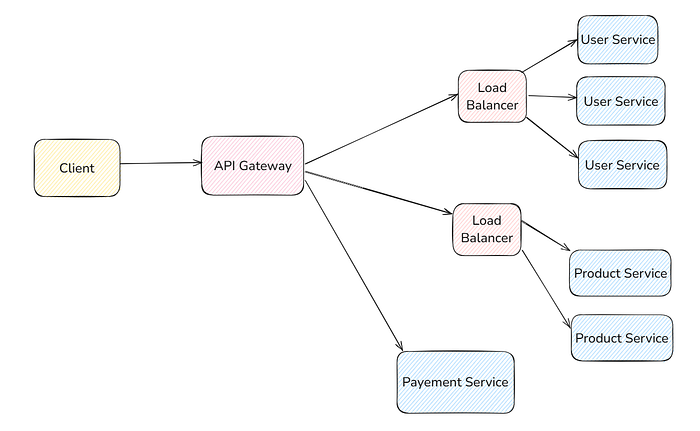
How do clients request in a microservice architecture?
Different microservice has different backends and are deployed independently.
Suppose user service is deployed in a machine with an IP address 192.168.24.32 , product service on 192.168.24.38 and so on with other services. All are deployed on different machines. It’s very hectic to use different IP addresses (or domain names) for each microservice. So, we use API Gateway for that.
The client does every request in a single end-point of the API gateway. It will take the incoming request and map it to the correct microservice.

You can scale each service independently. Suppose the product service has more traffic and requires 3 machines, user service requires 2 machines, and payment service is sufficient with 1 machine, then you can do this also. See the below picture
API Gateway provides several other advantages as well:
— Rate Limiting
— Caching
— Security (Authentication and authorization)
Load Balancer Deep Dive
Why do we need the Load Balancer?
As we saw earlier, in horizontal scaling, if we have many servers to handle the request, then we can’t give all the IP Addresses of the machines to the client and let the client decide which server to do the request.
Load Balancer acts as the single point of contact for the clients. They request the Domain Name of the Load Balancer, and the load balancer redirects to one of the servers which is least busy.
Exercise for you: I would highly recommend you read this blog to see how it is implemented.
What algorithm load balancer follow to decide which server to send the traffic to? We will study it in load balancer algorithms.
Load Balancer Algorithms
- Round Robin Algorithm
How it works: Requests are distributed sequentially to servers in a circular order.
Suppose we have 3 servers: Server-1, Server-2 and Server-3.
Then, in the round-robin, 1st request goes to server-1, the second request to server-2, the third request to server-3, the fourth again goes to server-1, the fifth to server-2, the sixth to server-3, then the seventh request again goes to server-1, eighth to server-2 and so on.
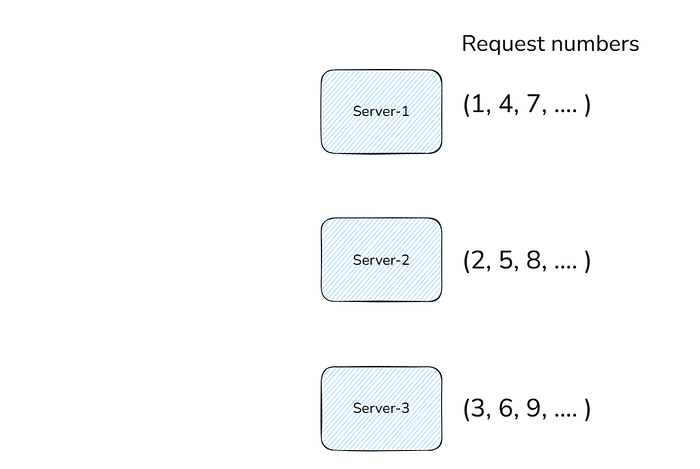
Advantages:
- Simple and easy to implement.
- Works well if all servers have similar capacity.
Disadvantages:
- Ignores server health or load.
2. Weighted Round Robin Algorithm
How it works: Similar to Round Robin, but servers are assigned weights based on their capacity. Servers with higher weights receive more requests. You can see in the below picture the request number to understand how it works. In the below picture, 3rd server is bigger (has more RAM, Storage, etc). So, twice the request is going to it than 1st and 2nd.
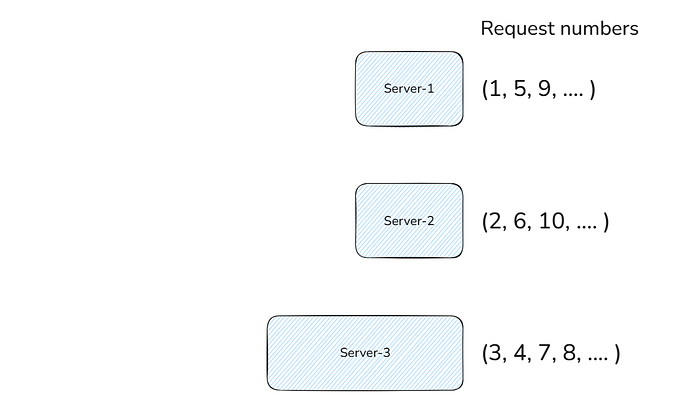
Advantages:
- Handles servers with unequal capacities better.
Disadvantages:
- Static weights may not reflect real-time server performance.
3. Least Connections Algorithm
How it works: Directs traffic to the server with the fewest active connections. The connection here can be anything like HTTP, TCP, WebSocket etc. Here, the load balancer will redirect traffic to the server which has the least active connection with the load balancer.
Advantages:
- Balances load dynamically based on real-time server activity.
Disadvantages:
- May not work well with servers handling connections with varying durations.
4. Hash-Based Algorithm
How it works: The load balancer takes anything, such as the client’s IP, user_id, etc, as input and hash that to find the server. This ensures a specific client is consistently routed to the same server.
Advantages:
- Useful for maintaining session persistence.
Disadvantages:
- Server changes (e.g., adding/removing servers) can disrupt hashing and session consistency.
That’s it for the load balancer.
Exercise for you: I would highly recommend you read this blog to see how load balance is configured. I would also encourage you to code your own load balancer from scratch using any of the above algorithms in any programming language, such as Go, NodeJS, etc.
Caching
Caching Introduction
Caching is the process of storing frequently accessed data in a high-speed storage layer so that future requests for that data can be served faster.
Ex: Suppose some data is taking 500ms to fetch from MongoDB Database, then it takes 100 ms to do some calculations in the backend on that data and finally send it to the client. So, in total, it takes 600 ms for the client to get the data. If we cache this calculated data and store it in a high-speed store like Redis and serve it from there, then we can reduce the time from 600 ms to 60 ms. (These are hypothetical numbers).
Caching means storing pre-computed data in a fast access datastore like Redis, and when the user requests that data, then serve it from Redis instead of querying from the database.
Example: Let’s take example of blog website. When we hit the route /blogs then we get all the blogs. If user hits this route first time then there is no data on cache so we have to get the data from database and suppose its response time is 800ms. Now we stored this data in Redis. Next time a user hits this route, he’ll get the data from Redis, not from database. The response time of this is 20ms. When a new blog is added, then, we have to somehow remove the old value of blogs from Redis and update it with a new one. It is called Cache invalidation. There are many ways for cache invalidation. We can set an expiry time (Time to live — TTL); after every 24 hrs, Redis will delete the blogs, and when the request comes the first time from any user after 24 hrs, then he’ll get data from DB. After that, it will be cached for the next requests.
Benefits of Caching:
- Improved Performance: Reduces latency for end-users.
- Reduced Load: Offloads backend databases and services.
- Cost Efficiency: Reduces network and compute costs.
- Scalability: Enables better handling of high-traffic loads.
Types of Caches
- Client-Side Cache:
- - Stored on the user’s device (e.g., browser cache).
- - Reduces server requests and bandwidth usage.
- - Examples: HTML, CSS, JavaScript files.
- Server-Side Cache:
- - Stored on the server.
- - Examples: In-memory caches like Redis or Memcached.
- CDN Cache:
- - Used for static content delivery (HTML, CSS, PNG, MP4 etc files).
- - Cached in geographically distributed servers.
- - Examples: AWS CloudFront, Cloudflare CDNs
- Application-Level Cache:
- - Embedded within application code.
- - Caches intermediate results or database query results.
This was just the introduction. We will go deep dive into each type of cache.
Redis Deep Dive
Redis is an in-memory data structure store.
In-memory means data is stored in RAM. And if you have basic knowledge of computer science, then you know that reading and writing data from RAM is extremely fast compared to disk.
We leverage this fast access for caching.
Databases use disks to store data. And reading/ writing is very slow compared to Redis.
One question you might be thinking is that if Redis is so fast, then why use a database? Can’t we rely on Redis to store all the data?
Ans) Redis stores data in RAM, and RAM has very little memory as compared to Disk. If you did coding in leetcode or codeforces, then sometimes you might get the “Memory Limit Exceeded” message. In the same way, if we store too much data in Redis, it can have a memory leakage error.
Redis stores data in key-value pairs. In the Database, we access data from the table the same way in Redis; we access data from keys.
Values can be of any data type like string, list, etc, as shown in the figure below.
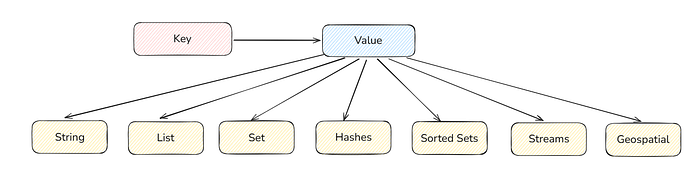
There are more data types also, but the above ones are mostly used.
I will be showing all the things about Redis on CLI, but you can configure all the corresponding things in any application, such as NodeJS, Springboot, and Go.
Run the below command to install and run Redis on your local laptop.
docker run -d --name redis-stack -p 6379:6379 -p 8001:8001 redis/redis-stack:latest
Naming convention of keys in Redis:
You can give any name to keys, but generally, industries follow this approach:
— Key for user with id 1 will be “user:1”
— Key for email of user id 2 will be “user:2:email”
Use “:” to separate things
Now, let’s discuss each data type
- String
- SET key value: Sets a key with a specific value.
- GET key: Retrieves the value associated with a key.
- SET key value NX: Stores a string value only if the key doesn’t already exist
- MGET key1 key2 … keyN: Retrieves multiple string values in a single operation

2. List
- LPUSH key value: adds value to left
- RPUSH key value: adds value to right
- LLEN key: returns length of list
- LPOP key: Pops left value and returns it. RPOP key: Pops right value and returns it.
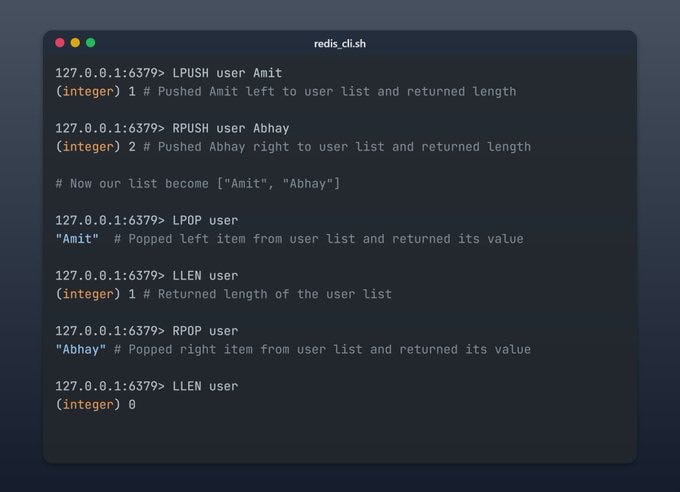
To make a queue, only do LPUSH and RPOP means push item from left side and pop items from right side (FIFO).
To make a stack, only do LPUSH and LPOP means push and pop items from same side (LIFO).
Try more commands and different datatypes on your own from the Redis documentation.
Below is a basic NodeJS use. Feel free to try it on your preferred backend language like Django, Go etc.
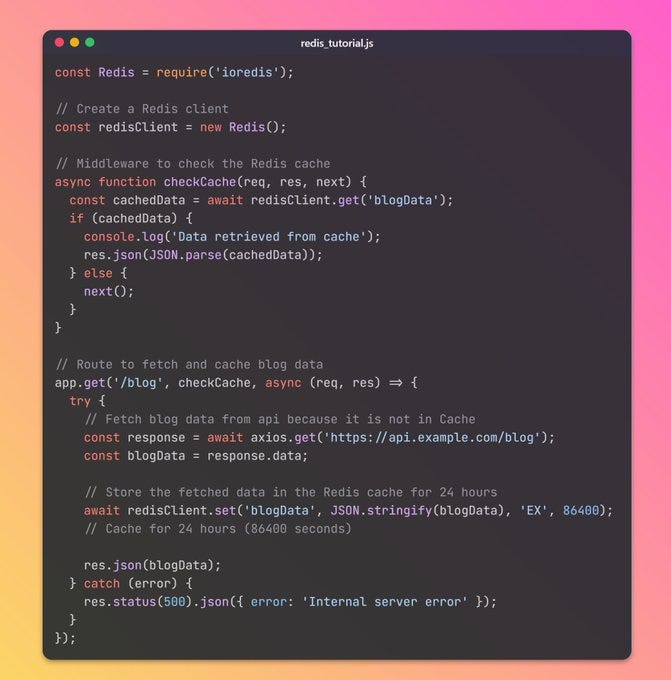
I have coded the same blog example. If /blog route got hit the first time, then data will come from apiCall or database. But after that, it is cached and served from Redis (Used in middleware). Data in Redis is valid for 24 hrs. After that, it automatically gets deleted from Redis.
Below is the diagram of the code.

Cash Hit means data is present in the cache.
Cash Miss means data is not present in the cache.
The other way of caching is whenever the server writes to the database at the same it writes to the cache (redis) as well.
Example: When there is a contest in codeforces, whenever some user submits any questions, then you immediately update the rank list in the Database and Redis same time so that the user will see the current ranking if you are serving the rankings list from Redis.
Try out different commands of Redis from the documentation.
Doc Link: https://redis.io/docs/
Implement Redis on your projects.
- Nodejs: https://npmjs.com/package/ioredis
- Django: https://pypi.org/project/django-redis/
- Go: https://redis.uptrace.dev
Blob Storage
What is a Blob, and why do we need Blob Storage?
In databases, text and numbers are stored as it is. But think of something like a file such as mp4, png, jpeg, pdf etc. These things can’t just be stored in rows and columns.
These files can be represented as a bunch of 0s and 1s, and this binary representation is called Blob (Binary Large Object). Storing data as mp4 is not feasible, but storing its blob is easy because it's just a bunch of 0s and 1s.
The size of this Blob can be very big like a single mp4 video can be 1 GB. If you store this in databases like MySQL or MongoDB, your queries become too slow. You also need to take care of scaling, backups, and availability by storing such a large volume of data. These are some reasons why we don’t store Blob data into Database. Instead, we store it in a Blob Storage that is a managed service (Managed service means its scaling, security, etc, are taken care of by companies such as Amazon, and we use it as a black box).
Example of Blob Storage: AWS S3, Cloudflare R2.
AWS S3
This is just an introduction to S3. If you want to learn it in detail with examples and implementation, then you can follow my AWS Series.
S3 is used to store files (blob data) such as mp4, png, jpeg, pdf, html or any kind of file that you can think of.
You can think of S3 as Google Drive, where you store all your files.
The best thing about S3 is its very cheap. Storing 1 GB of data in S3 is a lot cheaper than storing it in RDS (RDS is the DB service of AWS that provides various DBs such as PostgreSQL, MySQL, etc).
Features of S3:
- Scalability: Automatically scales to handle large volumes of data.
- Durability: S3 provides 99.999999999% (11 9s) durability.
- Availability: High availability, with various service-level agreements.
- Cost Efficiency: Pay-as-you-go model.
- Security: Encryption at rest and in transit, bucket policies, and IAM permissions.
- Access Control: Fine-grained control using policies, ACLs, and pre-signed URLs.
I am not covering S3 in detail here.
Exercise for you: Your task is to make an application in your desired language (such as nodejs, spring boot, fast API, etc) with an image upload feature. When a user uploads an image, it gets stored in S3. Code this exercise, then you will learn a lot about S3 rather than reading theoretical stuff.
Content Delivery Network (CDN)
CDN Introduction
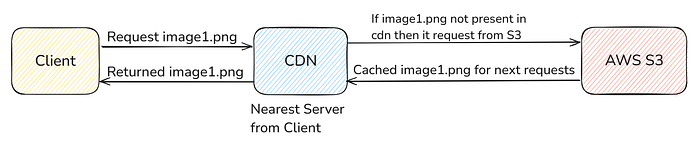
CDNs are the easiest way to scale static files (such as mp4, jpeg, pdf, png etc). Suppose files are stored in the S3 server, which is located in the India region. When users from the USA, Australia or far away from India request these files, then it will take a lot of time to serve them. Request served from the nearest location is always faster than serving it from a long distance. Now, we want these files to be stored in their nearest location for low latency. This we do with the help of CDNs.
CDNs are a bunch of distributed servers which is kept in different parts of the earth. These servers are used to deliver static content (like images, videos, stylesheets etc). It works by caching and serving content from the server closest to the user, reducing latency, load times, and bandwidth costs.
Examples of CDN: AWS CloudFront, Cloudflare CDN
How does CDN work?
When the user requests the content, the request goes to its nearest CDN server (called edge server). If the content is present in the edge server then it is returned from there. If it is not present, then it is fetched from the Origin Server (original S3 where the content is kept), then cached into the edge server and finally returned to the user. For subsequent requests, if the content is present in the edge server, then it is returned from there.
Key Concepts in CDNs
1. Edge Servers
- These are geographically distributed servers where CDN providers cache your content.
- Users are routed to the nearest edge server for faster delivery.
2. Origin Server
- This is your main web server (e.g., AWS S3).
- The CDN fetches content from here if it’s not already cached at the edge server.
3. Caching
- CDNs store copies of your static content (e.g., images, videos, HTML) in their edge servers.
- Cached content is served directly to users, reducing the need for frequent requests to the origin server.
4. TTL (Time to Live)
- The duration for which a file is cached on a CDN edge server.
- Example: An image might have a TTL of 24 hours, meaning it stays cached for 24 hours before being refreshed.
5. GeoDNS
- CDNs use GeoDNS to route users to the nearest edge server based on their geographic location.
This covers the theory part of CDN.
Exercise for you: Your task is to configure AWS CloudFront CDN with an S3 bucket to see this in practice. You can follow my AWS Series. There we will cover it.
Message Broker
Asynchronous Programming
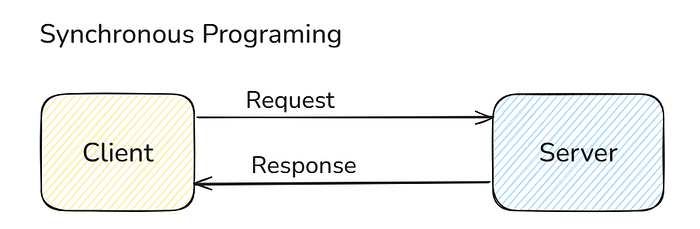
Before that, we need to know what is Synchronous Programming. It means whenever the client sends a request, the server processes the request and immediately sends back the response. Most of the things we build are synchronous in nature.
Suppose there is some long-running running task which takes 10 mins to complete, then the synchronous approach is not good. We can’t let the client wait for a long time, and also, the HTTP timeout will happen. In such cases, when a client requests such a task, then we don’t send the result of that task; instead, we send him some message in response that “your task is processing” and start some background workers to do the task. When this task is completed after some time, then maybe we can notify the client via email or something. This is called asynchronous programming, where we don’t immediately do the task but rather do it in the background while the client doesn’t have to wait for it.
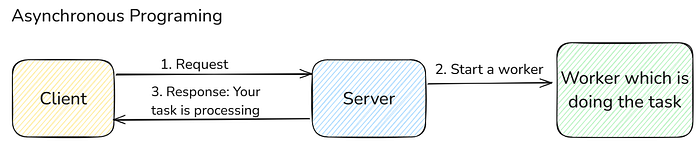
Here, we don’t directly assign the task to the worker; instead, we place a message broker in between.

This message broker acts like a queue in between. The server puts the task as a message in the queue, and the worker pulls it from the queue and processes it. After processing is completed, the worker can delete the task message from the queue.
The server which puts the message into the message queue is called the producer, and the server that pulls and processes the message is called the consumer (or worker).
Why did we put a message broker in between?
- It gives reliability. Suppose the producer goes down. Still, workers can function without any problems.
- It also gives the retry feature. Suppose the worker fails to process in between, then it can retry after some time because the message is still present in the message broker.
- It makes the system decoupled. Producers and consumers can both do the task at their own pace, and they are not dependent on each other.
Message Brokers are of two types:
- Message Queues (Example: RabbitMQ, AWS SQS)
- Message Streams (Example: Apache Kafka, AWS Kinesis)
Message Queue
As the name suggests, it is a kind of queue where the producer puts the message from one side, and the consumer pulls out the message to process from the other side.
The only thing different between a message queue and a message stream is that a message queue can only have one kind of consumer for one type of message.
Suppose you have a message queue where you put the metadata of the video and let the consumer get the video from metadata and transcode it to various formats (480p, 720p etc).

After the transcoder service done the transcoding of the video, it deletes the message from the message queue. Various message queues, such as RabbitMQ, AWS SQS, etc, provide APIs to delete messages from the queue.
If one video transcoder server is not enough, then what will we do?
Ans) We will horizontally scale it. Any one server who is free can pickup the message from the message queue, process it and delete it from the queue after processing.
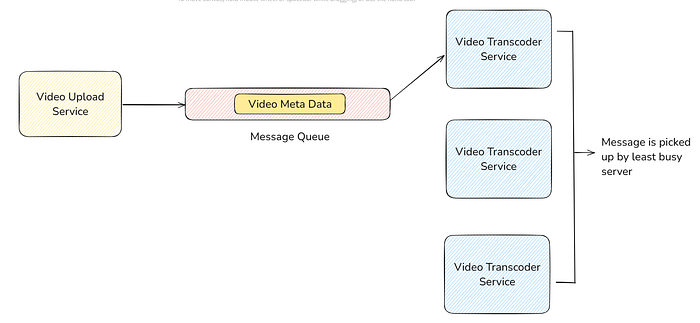
This way, we can also do parallel processing. Means more than one message at a time. Let us have 3 consumers, as shown in the figure, and then all three can work on 3 different messages at one time.
Why do we need a message stream?
Suppose, you also wanted to add captions to the video by a Caption Generator Service. How will you do this? Since the video transcoder service does its job and deletes the message from the message queue. One answer could be you will have two message queues; one is connected to the Video Transcoder Service, and the other is connected to the Caption Generator Service. This is not a good solution. Suppose the video upload service (producer) writes to one queue, but before writing to another queue, it fails. Then, in that case, you will have inconsistency because you have the video transcoded, but the caption is not generated. In such a scenario, we don’t use message queues. Instead, we use message streams to solve the problem.
Message Stream
In this, for one message we can have more than one type of consumer.
When to use Message Stream?
When you want: “Write to one and read by many”.
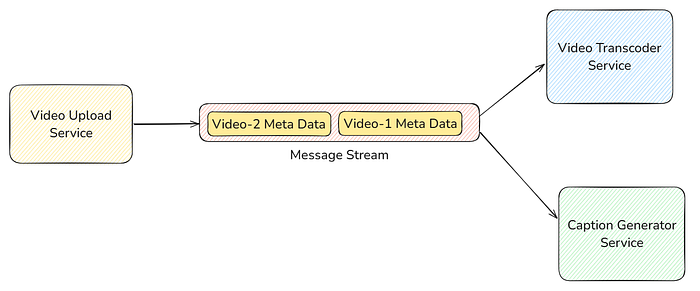
You may be wondering, if the video transcoder service deletes the message after processing, then how will the caption generator service take the message? And if the video transcoder service doesn’t delete the message, then it can process that message multiple times. Well, it doesn’t happen that way.
In message streams, the consumer service iterates over the messages. It means the Video transcoder service, caption generator service and any other consumer service will iterate over the message one by one, i.e., it will first go to video-1 metadata, then video-2 metadata and so on. So, in this way, these messages are only processed once by any type of consumer service. For the deletion part, the messages are never deleted. It lies there forever. You can manually delete it, or you can set an expiry time, but consumer services can’t delete the message in message streams.
I hope the difference between message queues and message streams is clear.
When do we use Message Brokers?
You have two microservices. The two most common ways to communicate between them are through Rest APIs and Message Message Broker.

We use message brokers when:
- The task is non-critical. This means we can afford to send them with some delay.
- Ex: Sending email
- The task takes a long time to compute.
- Ex: Video Transcoding, Generating PDF etc
That’s it for the message broker theoretical part.
Exercise for you: Your task is to utilise RabbitMQ or AWS SQS (anyone) in your project to see this in action.
Apache Kafka Deep Dive
When to use Kafka?
Kafka is used as a Message Stream.
Kafka also has very high throughput. This means you can dump a lot of data simultaneously in Kafka, and it can handle it without crashing.
Ex: Suppose Uber is tracking the driver’s location. After every 2 seconds, get the driver’s location and insert it. If there are thousands of drivers and we do thousands of writes in the Database every 2 sec, then the Database might go down because DB’s throughput (no. of operations per sec) is low. We can put those data every 2 sec in Kafka because its throughput is very high. After every 10 minutes, the consumer will take those bulk data from Kafka and write them into the DB. In this way, we perform operations in DB every 10 minutes, not every 2 sec.
Kafka Internals
- Producer: Publishes messages to Kafka. As for sending email, the producer can send {“email”, “message”} to the Kafka.
- Consumer: Subscribes to Kafka topics and processes the feed of messages.
- Broker: Kafka server that stores and manages the topics.
- Topic: A category/feed name to which records are published.
- sendEmail can be a topic.
- writeLocationToDB can be a topic.
- Let’s take the analogy of a Database:
- Broker = Database Server
- Topics = Tables
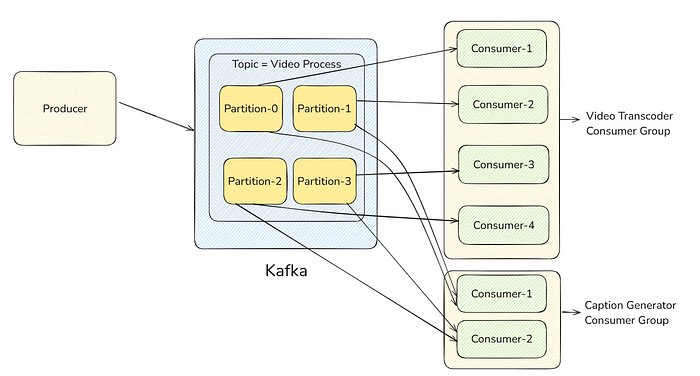
- Partition: Each topic is divided into partitions for parallelism. Partition is similar to sharding in DB Tables. On what basis do we do partition? For that, we have to decide and code it ourselves.
- Suppose, for our sendNotification topic, we partition it based on location. North Indian’s data goes to Partition 1, and South Indian’s data goes to Partition 2.
- Consumer Groups: When we make a consumer that subscribes to a topic, we have to assign a group to the consumer. Each consumer within a group does one type of processing from a subset of partitions.
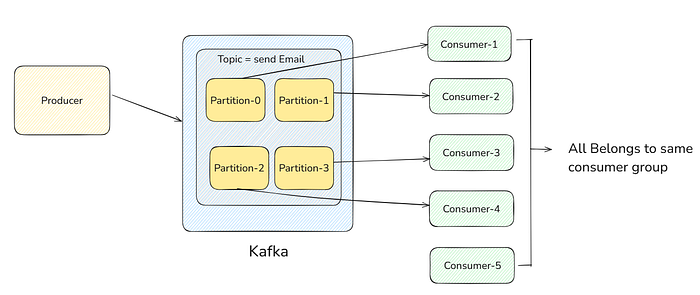
- Ex: For video processing, as we saw earlier, we can have two consumer groups. One consumer group is for video transcoding, and the other consumer group is for caption generating.
Let’s consider a topic with four partitions and one consumer group with three consumers (maybe 3 different servers part of the same consumer group) subscribed to that topic.
Partitions: [Partition-0, Partition-1, Partition-2, Partition-3]
Consumers: [Consumer-1, Consumer-2, Consumer-3]
In this scenario, Kafka performs a rebalance to distribute partitions among consumers. This rebalancing of Kafka does its own. We don’t have to write code for it.
Consumer-1 is assigned to Partition-0, Consumer-2 to Partition-1, Partition-2 and Consumer-3 to Partition-3.
If the number of consumers subscribed to a topic in a group is greater than the number of partitions of that topic, then each consumer processes 1 partition, and the extra consumers don’t do anything.
This means 1 partition of a topic can be processed by only 1 consumer of one group, but different consumers of different groups can process the same topic.
Did you understand? If we want to horizontally scale our consumers, then we have to also do at least an equal number of partitions of the topic as the consumers.
Below pic, you can see that we have two different consumer groups, one for video transcoding and the other for caption generating. And you can also see that Kafka balanced all the partitions between the consumers of each group.
That’s it for Kafka's theoretical part.
Exercise for you: Your task is to set up Kafka locally on your laptop and code any application which involves Kafka in NodeJS (or any other framework) so that you will get a better understanding. I am not showing code here, but I have taught all the required theories. The coding part is easy when you understand the theory.
Realtime Pubsub
In Message Broker, whenever a publisher pushes a message to the message broker, it remains in the broker until the consumer pulls it from it. How message is pulled from the broker? All message brokers like AWS SQS provides APIs (or SDK) to do this.
In Pubsub, as soon as the publisher pushes a message to the Pubsub Broker, it immediately gets delivered to the consumers who are subscribed to this broker. Here, consumers don’t do an API call or anything to get the message. Message automatically gets delivered to the consumer in realtime by the Pubsub broker.
In short, in the message broker, consumers pull the message from the broker, while the Pubsub broker pushes the message to the consumer.
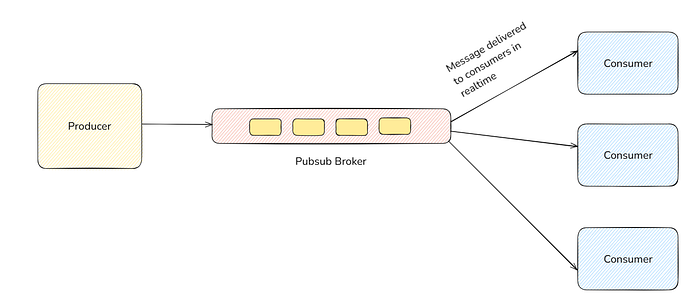
One thing to note here is messages are not stored/retained in the Pubsub broker. As soon as the Pubsub broker receives the message, it pushes it to all the consumers who are subscribed to this channel and gets done with it. It does not store anything.
Example of Realtime Pubsub Broker: Redis
Redis is not only used for caching but also for real-time Pubsub as well.
Where to use Realtime Pubsub?
There can be a wide variety of use cases. When you want to build a very low latency application, you utilise this Pubsub feature.
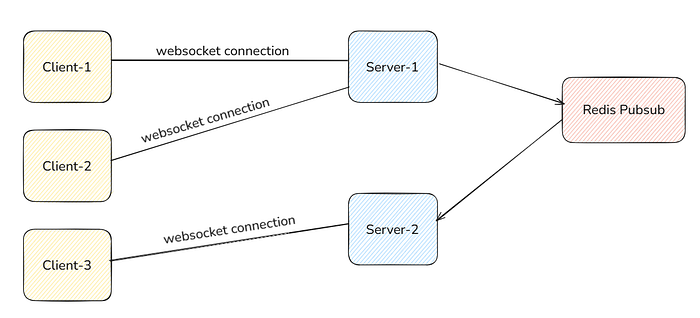
One use case is when you want to build a real-time chatting application. For chatting applications, we use Websocket. But in a horizontally scaled environment, there can be many servers connected to different clients, as you can see in the below picture.
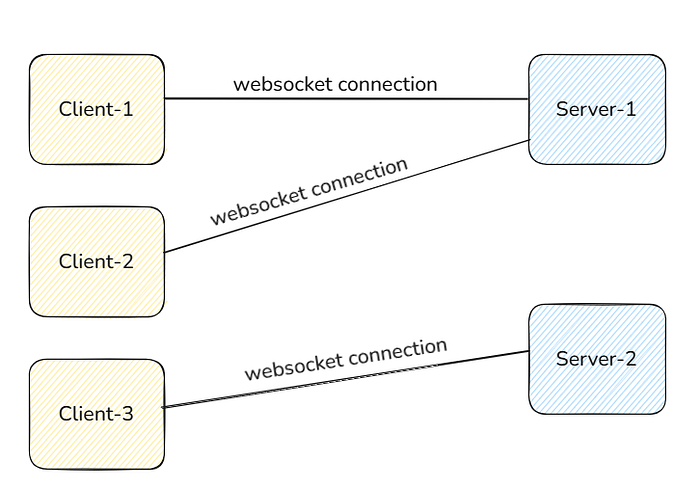
If client-1 wants to send a message to client-3, he can’t send it directly because client-3 is not connected to server-1, so server-1 will not be able to deliver the message to client-3 after receiving the message from client-1.
You need to somehow deliver the message of client-1 to server-2 then server-2 can send this message to client-3. You can do this via Redis Pubsub. See the below picture.
Exercise for you: Your task is to set up Redis locally (as we have done in the caching section) and explore its Pubsub feature.
Event-Driven Architecture
Introduction to EDA
EDA is the short form for event-driven architecture.
Before studying EDA, let’s understand why we need it.
Suppose we are building an e-commerce platform like Amazon. When a user purchases an item, he sends a request to Order Service. This order service verifies the item and calls Payment Service for payment. If payment is successful, then the user is redirected to the success page. Before the user is redirected to the success page, 2 APIs are called, which are an Inventory Service to update the inventory count of this product and a Notification Service to send an email to the user for this order.
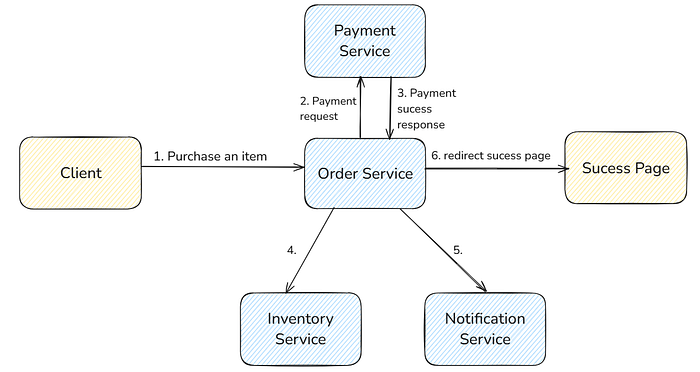
You can see that inventory and notification services have nothing to do with the success page. It doesn’t send any response to the client. So the client doesn’t need to wait for their response. These are non-critical tasks that can be done asynchronously.
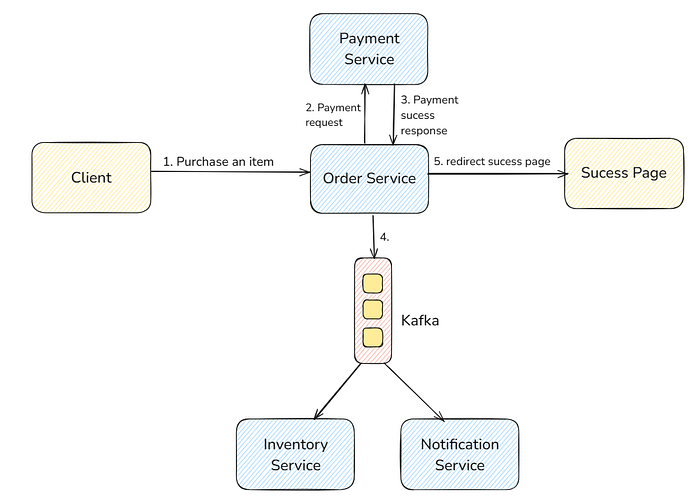
What we can do is put the task of order success information in the message broker and let the inventory and notification service consume it asynchronously without making the client wait. That is event-driven architecture, where the producer puts the message (called event) in the message broker and forgets about it. Now, it’s the consumer’s duty to process it.
Why use EDA?
- Decoupling: Producers don’t need to know about consumers.
- In the above example, without using EDA, it was very tightly coupled. Suppose Inventory Service goes down, then it can affect the whole system because Order Service was directly calling it. But after using EDA, order service has nothing to do with inventory service.
- Resilience: Failure of one component doesn’t block others.
- Scalability: Each service can scaled horizontally without affecting each other.
Types of Even-Driven Patterns
There are 4 types of EDA Patterns:
- Simple Event Notification
- Event-Carried State Transfer
- Event Sourcing
- Event Sourcing with CQRS (Command Query Responsibility Segregation)
We will only study the first two patterns because in the world, most of the time, only the first two are being used. The bottom two have a very specific use case, so we will not cover them here.
Simple Event Notification
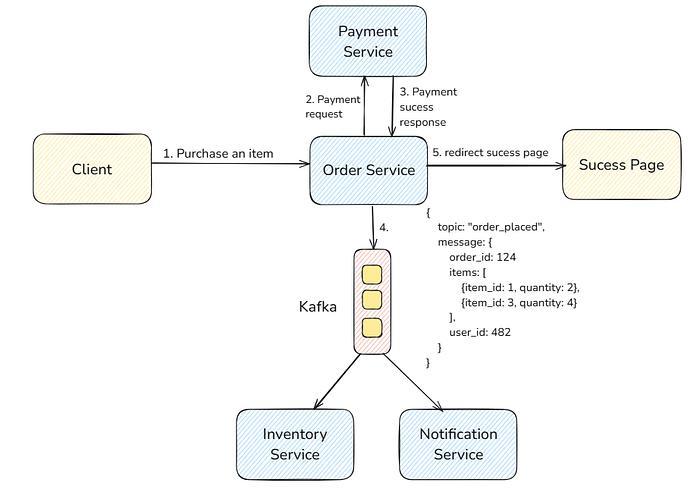
The above example that we saw is a simple event notification. Here, the producer only notifies that an event occurred. Consumers need to fetch additional details if required.
In this, the producer only puts lightweight info on the message broker. It can just put the order_id in, then the consumer pulls this from the message broker, and if a consumer wants additional info for this order_id, then it can query it from the database.

Event-Carried State Transfer
It is the same as the simple event notification pattern. The only difference here is that the producer sends all the necessary details as part of the event in the message broker, so consumers don’t need to fetch anything from the database (or external source).
Advantage: Reduced latency because consumers don’t need to make any extra network calls to fetch additional information.
Disadvantage: Events are larger in size, which could increase broker storage and bandwidth costs.
Distributed Systems
What is a Distributed System?
Suppose we are computing something. For example, the sum of all the prime numbers between 0 and 10000. Then we can simply run a for loop and calculate it. But suppose we need to count prime numbers from 0 to 10¹⁰⁰, then running this in a single computer is not feasible. We will hit the limit, and our single computer will choke. If you don’t believe then run a for loop from 0 to 10¹⁰⁰ on your laptop.
Distributed System helps us here. What it does is, leverage multiple computers to do a task. We will keep 10 computers to do this parallelly by dividing the task. This means one computer will calculate from (0 to 10¹⁰), the other will (10¹⁰ + 1 to 10²⁰) and so on. Finally, combine the results and return it to the client.
Simply put, a distributed system means work is done by a set of multiple machines instead of one.
Sharding is also an example of a distributed system where the data of a table cannot fit in a single machine, so we cut that table and put those pieces into multiple machines.
Horizontal scaling is also an example of a distributed system because multiple servers handle requests.
The most challenging part of a distributed system is how multiple machines coordinate with each other to do the task. And how to utilise those machines and divide the task equally.
From the client’s perspective, in a distributed system, clients should feel like they are making requests to a single machine (not multiple). It’s the job of the system to take requests from the client, do it in a distributed fashion, and return the result.
CAP theorem that we studied earlier is the fundamental theorem that applies in all distributed systems.
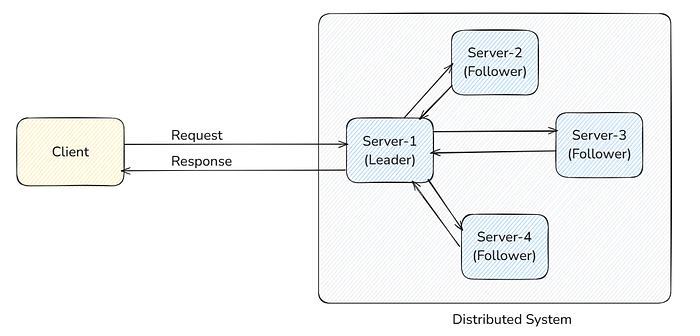
The common way in which most distributed systems are implemented is to select one server as the leader and all other servers as followers. The leader's responsibility is to take requests from the client and assign work to the followers. Followers do their job and return the result to the leader. The leader combines the results of all followers and returns them to the client.
The system needs to decide which server should be the leader in two cases:
- The first time when the entire system starts, then, it needs to decide which server should be the leader.
- When the leader goes down for any reason, then again, any follower should come forward and become the leader. For this, followers should quickly detect when the leader goes down at any moment.
How do you decide which server will become the leader?
For this, there are several leader election algorithms, such as:
- LCR Algorithm: Its time complexity is O(N²)
- HS Algorithm: Its time complexity is O(NlogN)
- Bully Algorithm: Its time complexity is O(N)
- Gossip Protocol: Its time complexity is O(logN)
We will not discuss these leader election algorithms here because it will go out of scope for system design. Distributed System is itself a very vast topic. But this much theory for distributed systems is enough from a system design point of view.
Just think of the leader election algorithm as a black box. It will make one of the servers the leader, and whenever the leader crashes or goes down, then the entire system (which means most servers) will automatically detect it and again run the leader-election algorithm to make any new server the leader.
Examples of distributed Databases: Apache Cassandra, AWS DynamoDB, MongoDB, Google Spanner, Redis, etc. These databases utilise sharding and horizontal scaling to accommodate large volumes of data and efficient querying.
Exercise for you: Study some leader election algorithms and code them in your favourite programming language.
Auto-Recoverable System using Leader Election
Suppose you built a horizontally scalable system where some servers are put behind a load balancer to serve the request. You want that every time, at least 4 servers will be there to serve the request, no matter what.
For this, you always need to monitor the server with your own eyes so that if some server crashes or goes down, you manually restart it. Don’t you think it's a tedious and boring task? In this section, we are going to study how to automate this. Whenever any server goes down, the system automatically detects it and restarts it without us manually doing it.
For this, we need an Orchestrator. Its job is to always keep monitoring the server, and whenever any server goes down, its orchestrator's job is to restart it.
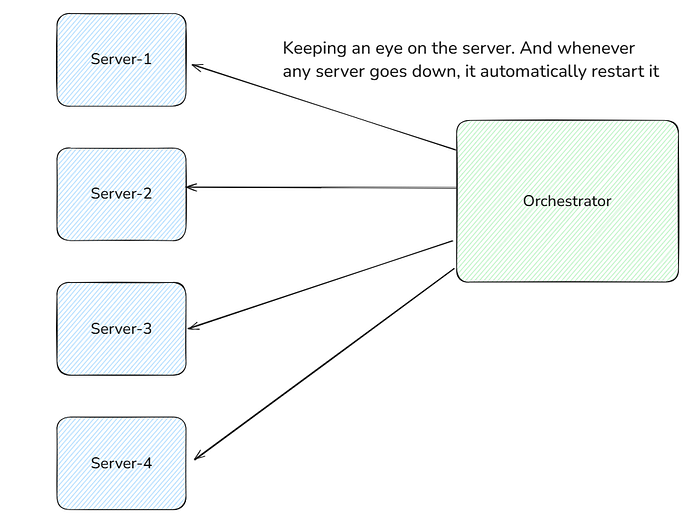
Now, what happens when the orchestrator goes down? Who is keeping an eye on the orchestrator?
In this scenario, the leader election algorithm comes in. Here, we don’t keep only one orchestrator server; instead, we keep a bunch of multiple orchestrator servers. We pick one of the orchestrator servers as leader-orchestrator using the leader-election algorithm. This leader-orchestrator keeps an eye on all the worker-orchestrators, and these worker-orchestrators keep an eye on servers. Whenever the leader-orchestrator goes down, then one of the worker-orchestrator will promote itself to become the leader using the leader-election algorithm.
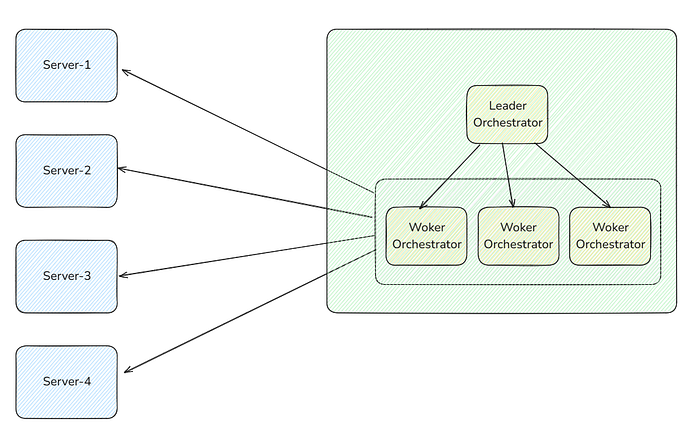
In this setup, we don’t need any human intervention. The system will be auto-recoverable on its own.
Whenever any server goes down, the worker-orchestrator will restart it. When any of the worker-orchestrators goes down, the leader will restart it. When the leader-orchestrator goes down, then one of the worker-orchestrator will promote itself to become the leader using the leader-election algorithm.
Big Data Tools
Example of big data tool: Apache Spark
When you have a very large amount of data, then we use big data tools to process it.
Big Data Tools uses the distributed system method.
Processing large amounts of data by a single machine is not possible. It will choke or become too slow. In this scenario, we use a distributed system.
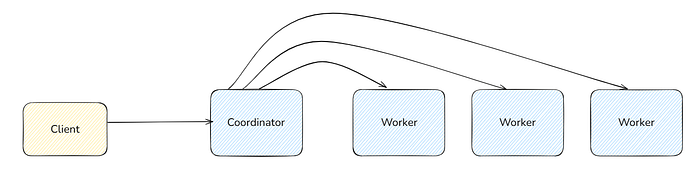
In this, we have a coordinator and workers. The client makes the request to the coordinator and its job is to divide the large dataset into smaller ones, assign it to the worker, take the result from the worker and combine it and return the result. Each worker computes a small dataset given by the coordinator.
There are several things to take care of by the coordinator in this system:
- If any worker crashes, then move its data to another machine for processing.
- Recovery: This means if any worker goes down, then restart it.
- Take the individual results from the worker and combine them to return the final result.
- Scaling and redistribution of data
- Logging
When to use distributed system (or big data tool)?
When a single EC2 instance is incapable of doing things and handling large data.
Some use cases are:
- Training Machine Learning Models.
- Analyze social networks or recommendation systems
- Taking large amounts of data from multiple sources and dumping it into any warehouse.
Building this system is very hard, as you saw several things that needed to be taken care of. It's a very common problem, so there are several open-source tools (such as Spark and Flink) which give this infrastructure of coordinators and workers.
We are only concerned about business logic, like writing code for training ML Models. Big Data tools such as Apache Spark give us the distributed system infrastructure. We use it as a black box and only write our business logic in Python, Java or Scala in the form of jobs in Spark, and Spark will process it in a distributed fashion.
We will not study Apache Spark in detail here because designing data-intensive applications is itself a vast field. You will learn it only when you work in any company that deals with big data. For system design interviews, this theory on big data is enough.
Consistency Deep Dive
First of all, we need to know that consistency will only be considered when we have a distributed stateful system.
Stateful System: The machines (or servers) store some data for future use.
Stateless System: The machine doesn’t hold any useful data.
Most of the time, our application servers are stateless. They don’t hold any data. However, databases are stateful because they store all the data for our application.
Distributed means leveraging multiple machines instead of one to do our work.
Since consistency means data should be the same across all nodes (machines) at any point in time. So, it will only come into the picture when we have distributed systems which are stateful. That’s why the term consistency only comes into the picture with databases, mostly, not with application servers.
We use databases as a black box. Because of that, you may not do much coding here but don’t skip it. It is very important. In future, if you code any stateful application or build your own database, then these concepts will be useful. Also, whatever database, like DynamoDB, Cassandra, MongoDB, etc, you are using, do check what type of consistency they provide.
Consistency is mainly classified into two types:
- Strong Consistency
- Eventual Consistency
Strong Consistency
- Any read operation after a write operation will always return the most recent write.
- Once a write is acknowledged, all subsequent reads will reflect that write.
- All replicas must agree on the current value before acknowledging a write.
- The system behaves as if only one copy of the data exists.
When to choose strong consistency?
- Banking system where a user transfers money from one account to another.
- Trading application where the user gets the latest and correct share prices.
Eventual Consistency
- It does not guarantee immediate consistency after a write operation but ensures that eventually, after some time, all reads will return the same value.
- There might be a delay before all replicas reflect the latest write.
- Since you compromised with consistency here, you will get high availability (CAP theorem).
- If two replicas have different data, then any “conflict resolution mechanism” has to be implemented to resolve conflicts.
When to choose eventual consistency?
- Social media apps. If likeCount of any posts are inconsistent and later gets corrected, we are fine.
- Product catalogues of e-commerce apps.
Ways to achieve strong consistency
- Synchronous Replication
- When a write operation is performed, all replicas are updated before acknowledging the write to the client.
- Ex: Distributed databases like Google Spanner use synchronous replication.
- Quorum-Based Protocols
- In distributed databases, the leader-follower setup is followed, as we studied in the distributed system section. When a follower completes the write or read operation, it gives acknowledgement to the leader.
- - Read quorum refers to the number of followers who return the data for a read. Suppose, for key user_id_2, value “Shivam” is returned by 5 nodes. Then its read-quorum is 5.
- - Write quorum refers to the number of followers who acknowledge the successful right for a particular key.
- In Strong consistency, if
Wis write-quorum andRis read-quorem thenW + R > Nwhere N is the total number of nodes. - Ex: AWS DynamoDB and Cassandra
- Consensus Algorithms
- It's a vast topic of distributed systems, so we will not cover it here. The summary is that it uses a leader election algorithm. And, a write or read is successful when more than 50% of nodes acknowledge it.
- If you want to know more about it then learn Raft. It is an easy consensus algorithm.
- Ex: Docker Swarm uses Raft internally
Ways to achieve eventual consistency
- Asynchronous Replication
- Writes are acknowledged immediately, and updates are propagated to replicas in the background.
- Ex: Common in NoSQL databases like Cassandra, MongoDB, and DynamoDB (default mode).
- Quorum-Based Protocols (Relaxed Consistency)
- Read Quorum + Write Quorum ≤ Number of Nodes
- Ex: Amazon DynamoDB in eventual consistency mode.
- Vector Clocks
- It's also a long and niche topic. We will not discuss here.
- Ex: AWS DynamoDB
- Gossip Protocol
- Nodes exchange heartbeats with a subset of other nodes, spreading updates throughout the system. Heartbeat is just HTTP or TCP requests sent periodically every 2–3 seconds. This way, we detect any failed nodes. For failed nodes, we configure a degree of consistency from how many replicas read and writes should be allowed.
- Ex: DynamoDB, Cassandra uses it
Consistent Hashing
Consistent hashing is an algorithm that tells which data belongs to which node. It's just an algorithm, nothing else.
Since data is involved so, consistent hashing is mostly used with the stateful applications and the system is distributed.
As we discussed in the previous section, application servers are stateless, and databases are stateful, so consistent hashing is mostly used with databases. If you code any backend application, then it may not be used, but if you are coding any database from scratch, then this can be used there.
Why do we need Consistent Hashing?
Suppose we have a key-value distributed database and we don’t use consistent hashing then we will follow the following simple approach to find which database server a particular key belongs:
- Hash the key with any hash function (such as SHA256, SHA128, MD5, etc).
- Then, take Mod of that with the number of servers to find its belonging.
Let's the number of servers is 3.
key1 belongs to => (Hash(key1) % 3) server
This approach is perfectly fine when the number of servers is fixed. This means we don’t have an auto-scaling or a dynamic number of servers.
When the number of servers becomes dynamic, then problems occur.
Suppose, for our previous example, the number of servers changed from 3 to 2. Then now, key1 belongs to => (Hash(key1) % 2) server. This number can be different from the previous one.
You saw that key1 may now belong to a different server. So, we need to move key1 from one server to another. This is the drawback of the above approach. If we follow the above simple approach to find which key belongs to which server, then there will be a lot of data movements happening when the number of servers changes.
If we use a consistent hashing method to find which key belongs to which server, then the data movements will be minimal when the number of servers changes.
How Consistent Hashing used to find which data belongs to which node?
- We take the server identity (such as IP or ID) and pass it to a hash function such as SHA128. It will generate some random number between [0, 2¹²⁸).
- For visualization, we will place it in the ring. Divide the ring into [0, 2¹²⁸), i.e., the range of hash. Whatever the number comes by passing the server_id to the hash function, place that server on that place of the ring.
- Similarly, do the above thing for the keys also. Divide the circle in the same range as the hash function, then pass the key to the hash function, and whatever the number comes, place the key at that position of the ring.
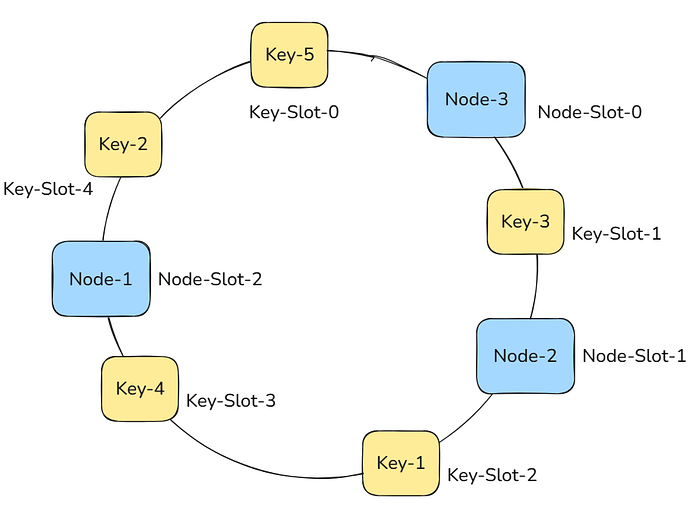
Any key will go to its nearest clockwise server. In the above example:
- key-1 and key-4 belongs to Node-1
- key-3 belongs to Node-2
- key-2 and key-5 belongs to Node-3
Suppose Node-2 is removed from the above setup, then the key-3 will go to Node-1, and no other keys will be affected. This is the power of consistent hashing. It makes the minimum movement of keys. But it is not the job of consistent hashing to do this movement. You need to do it yourself. Consistent hashing is just an algorithm that tells which key belongs to which node.
In real life, you can manually copy-paste or take snapshots of the data to move it from one server to another.
Use of consistent hashing: Distributed databases such as AWS DynamoDB, Apache Cassandra, Riak use it internally.
Exercise for you: Implement consistent hashing in your favourite programming language. I told the logic above. It's just a leetcode-medium level problem to implement it.
Data Redundancy and Data Recovery
First, understand the meaning of the English word Redundancy. It means creating multiple copies of the same data.
We make our database redundant and store the copy of data in multiple database servers (machines).
Why do we make databases redundant?
- Storing backup of the data ensures that if some natural calamity happens and the data centre where our DB server is kept physically gets submerged in a flood or something, then we don’t lose the data.
- If some technical failure happens and somehow the disk of the database server gets corrupted or crashes, at that time we don’t lose the data if we have a copy of it on a different server.
Different ways of doing data backup
There is no rule. It depends upon your personal preference for how you restore and take backup of your data. But here I am mentioning some general ways that tech companies follow:
- Do daily backup every day at night. Whatever changes are made in the database, take a snapshot (replicate) and store it in a different database server.
- Do a weekly backup.
In this way, if some failure happens in the database server, then you have the data at least till the last day or last week.
Continuous Redundancy
The above ways that I mentioned about daily and weekly backup are generally not followed now. Most companies nowadays follow continuous redundancy.
In continuous redundancy, we set up two different database servers. One is the main, and the other is the replica.
When we do any read or write operation, then it is done in the main and gets replicated synchronously or asynchronously (according to your configuration choice) into the replica. This Replica DB doesn’t participate in any read / write operation from the client. Its only job is to keep itself in sync with the main DB. When DB failure happens in the main, then this replica becomes the main DB and starts serving the request. In this way, we made our system resilient.

Your task is to set up this Replica in any cloud provider (like AWS RDS) and see how this thing is done in the real world.
And second task is to do it locally. Set up two MySQL servers locally on the laptop and configure this replication. Write to the main and see if it gets replicated into the replica.
Proxy
What is Proxy?
A proxy is an intermediary server that sits between a client and another server.
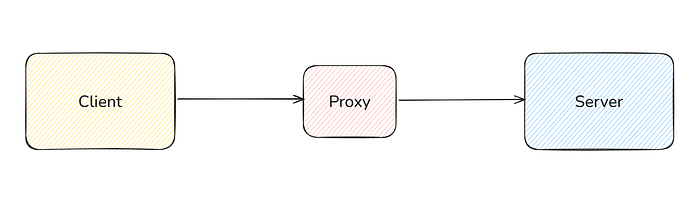
You may be wondering why we introduced an over-head in between. There are several use-cases of it that we will study here.
There are two kinds of proxy:
1. Forward Proxy
2. Reverse Proxy
Forward Proxy
A forward proxy acts on behalf of the client. When a client makes a request, this request goes through a forward proxy. The server doesn’t know about the client's identity (IP). The server will only know the forward proxy IP.
If you ever use a VPN to access websites, then it is an example of a forward proxy. VPN request on behalf of you.
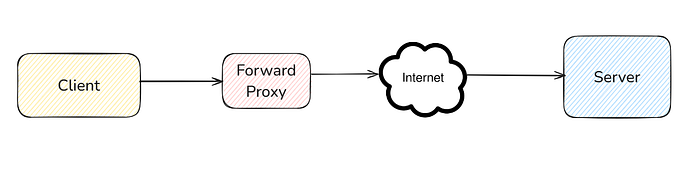
Main Feature: Hides the client. The server only sees the forward proxy, not the client.
Use Cases:
- Clients use forward proxies to access restricted content (e.g., accessing geo-blocked websites).
- It is also used for caching. Forward proxy can cache the frequently accessed content so the client won’t have to make a request to the server. Content is directly returned from the forward proxy.
- Organisations (such as companies, colleges etc) sets up a forward proxy to control employees’ internet usage by filtering certain websites.
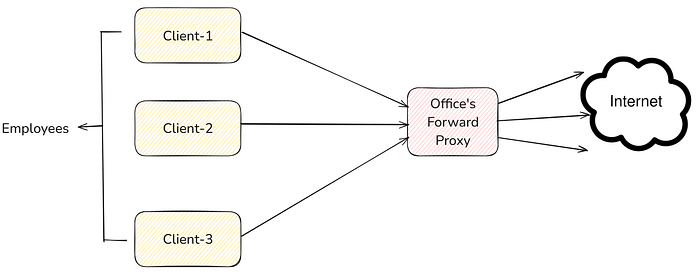
Flow:
- Client requests
www.abc.com. - Forward Proxy receives the request and forwards it to the server.
- The server sends the response back to the forward proxy.
- Forward proxy sends the response to the client.
That’s it for the forward proxy. In system design, we mostly focus on the reverse proxy, not on the forward proxy, because forward proxy is related to the client (frontend). In system design, we mostly build server-side (backend) apps.
Reverse Proxy
A reverse proxy acts on behalf of a server. Clients send requests to the reverse proxy, which forwards them to the appropriate server in the backend. The response goes back through the reverse proxy to the client.
In forward proxy, servers don’t know the client’s identity, but in reverse proxy, the client doesn’t know about the server. They send the request to reverse proxy. It is the job of the reverse proxy to route this request to the appropriate server.

Main Feature: Hides the server. The client only sees the reverse proxy, not the server.
An example of a reverse proxy could be a load balancer. In load balancers, clients don’t know about the actual server. They send requests to load balancers.
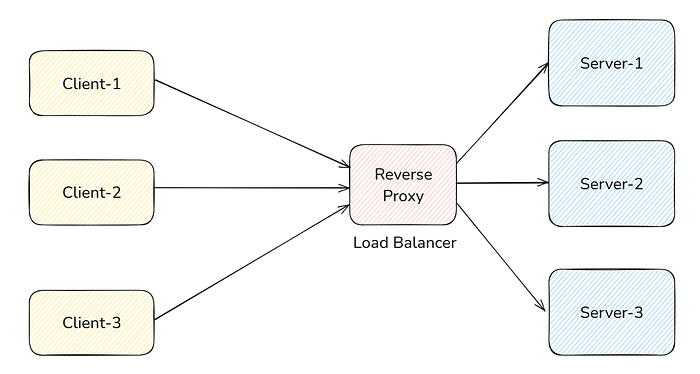
Use Cases:
- Load Balancer, as you saw above.
- SSL termination: Handles encryption and decryption, reducing server workload.
- Caching: Stores static content to reduce server load.
- Security: Protects backend servers from direct exposure to the internet.
Flow:
- Client requests
www.abc.com. - The reverse proxy receives the request.
- Reverse proxy forwards the request to one of several backend servers.
- The server sends the response back to the proxy.
- Proxy sends the response to the client.
Example of Reverse Proxy: Ngnix, HAProxy
Exercise for you: Learn about Ngnix and use it in your side projects.
Building our own Reverse Proxy
We learnt a lot about reverse proxy, but without coding, our learning is not sufficient. So, here we will code our own reverse proxy from scratch in NodeJS. Code will be straight forward, so even if you don’t know NodeJS still, you will understand it.
Suppose we have two microservices: one is the Order microservice, and the other is a Product microservice. Request coming with /product will go to Product microservice and request coming with /order will go to Order microservice. Clients will only request to reverse proxy. and the work of forwarding the requests to the correct microservice by seeing the URL is done by the reverse proxy.
Suppose Product Microservice is hosted in http://localhost:5001 and Order Microservice is hosted in http://localhost:5002 . Here, if you host this in actual AWS EC2, then you can replace these with their domain or IP address.
1. Install Dependencies
You’ll need Node.js installed on your system. Start by initializing a new Node.js project and installing the required library.
npm init -y
npm install http-proxy
2. Create the Reverse Proxy Server
const http = require('http');
const httpProxy = require('http-proxy');

// Create a proxy server
const proxy = httpProxy.createProxyServer();

// Define target servers
const targets = {
  productService: 'http://localhost:5001',
  orderService: 'http://localhost:5002',
};

// Create the reverse proxy server
const server = http.createServer((req, res) => {
  // Route requests based on URL path
  if (req.url.startsWith('/product')) {
    proxy.web(req, res, { target: targets.productService }, (error) => {
      console.error('Error proxying to product service:', error.message);
      res.writeHead(502);
      res.end('Bad Gateway');
    });
  } else if (req.url.startsWith('/order')) {
    proxy.web(req, res, { target: targets.orderService }, (error) => {
      console.error('Error proxying to order service:', error.message);
      res.writeHead(502);
      res.end('Bad Gateway');
    });
  } else {
    // Handle unmatched routes
    res.writeHead(404);
    res.end('Route not found');
  }
});

// Start the proxy server
const PORT = 8080;
server.listen(PORT, () => {
  console.log(`Reverse proxy server running at http://localhost:${PORT}`);
});
This reverse proxy is running on Port 8080.
If the client requests with http://localhost:8080/product . It will get forwarded to the product service backend.
Code is easy. Just read it. You will understand.
Although we made a simple implementation of reverse proxy, we don’t do it in production. We always use specialised reverse proxies like Ngnix. They are highly optimized and provide various other features such as caching, SSL termination etc.
Most things we learnt in this blog, we can code ourselves like load balancers, reverse proxy, message brokers, Redis, etc, but we don’t reinvent the wheel again. We use these tools as black boxes from a famous open source or big organisation that has solved these in the most optimised way.
How to solve any System Design Problem?
There can be many ways of approaching any system design problem, but this is what I feel is a good way to solve a problem (based on my experience):
- Understand the problem statement
- Ex: Suppose the problem is to build an e-commerce application (like amazon). Then, understand what the requirements are and what features we need to build.
- Breakdown the big problem into multiple small solvable sub-problems
- Building e-commerce is a big problem. Break it into sub-problems like in an e-commerce app. The main features are:
- - Listing products
- - Search functionality for product
- - Order
- - Handling payment
- Focus on solving each sub-problem efficiently
- For each sub-problem, focus on these 4 things:
- - Database
- - Caching
- - Scaling and Fault Tolerance
- - Communication (async or sync)
- While solving any the sub-problem, if you think that you need to break this sub-problem into more sub-problems again then do it and decide the 4 things above for that problem.
Note: Only create a new sub-problem when it is actually needed. Don’t create it unnecessarily to over-complicate the design.
End of the blog
Congratulations if you read till the end.
It took me a lot of time to write this blog. I hope you enjoyed reading this.
The best thing you can do is implement all these things. I also gave exercises for implementation.
In the next series of blogs, we will solve common interview problems of System Design that are always asked in FAANG and other tech companies. This theory is more than enough to solve any problem.